创建 MoveIt 插件
This Page 详细说明了如何在 ROS 中添加插件。两个必需元素是基类和插件类。插件类继承自基类并覆盖其虚拟函数。用于此目的的主要库是 pluginlib。本教程包含三种不同类型的插件,即运动规划器、控制器管理器和约束采样器。
运动规划器插件
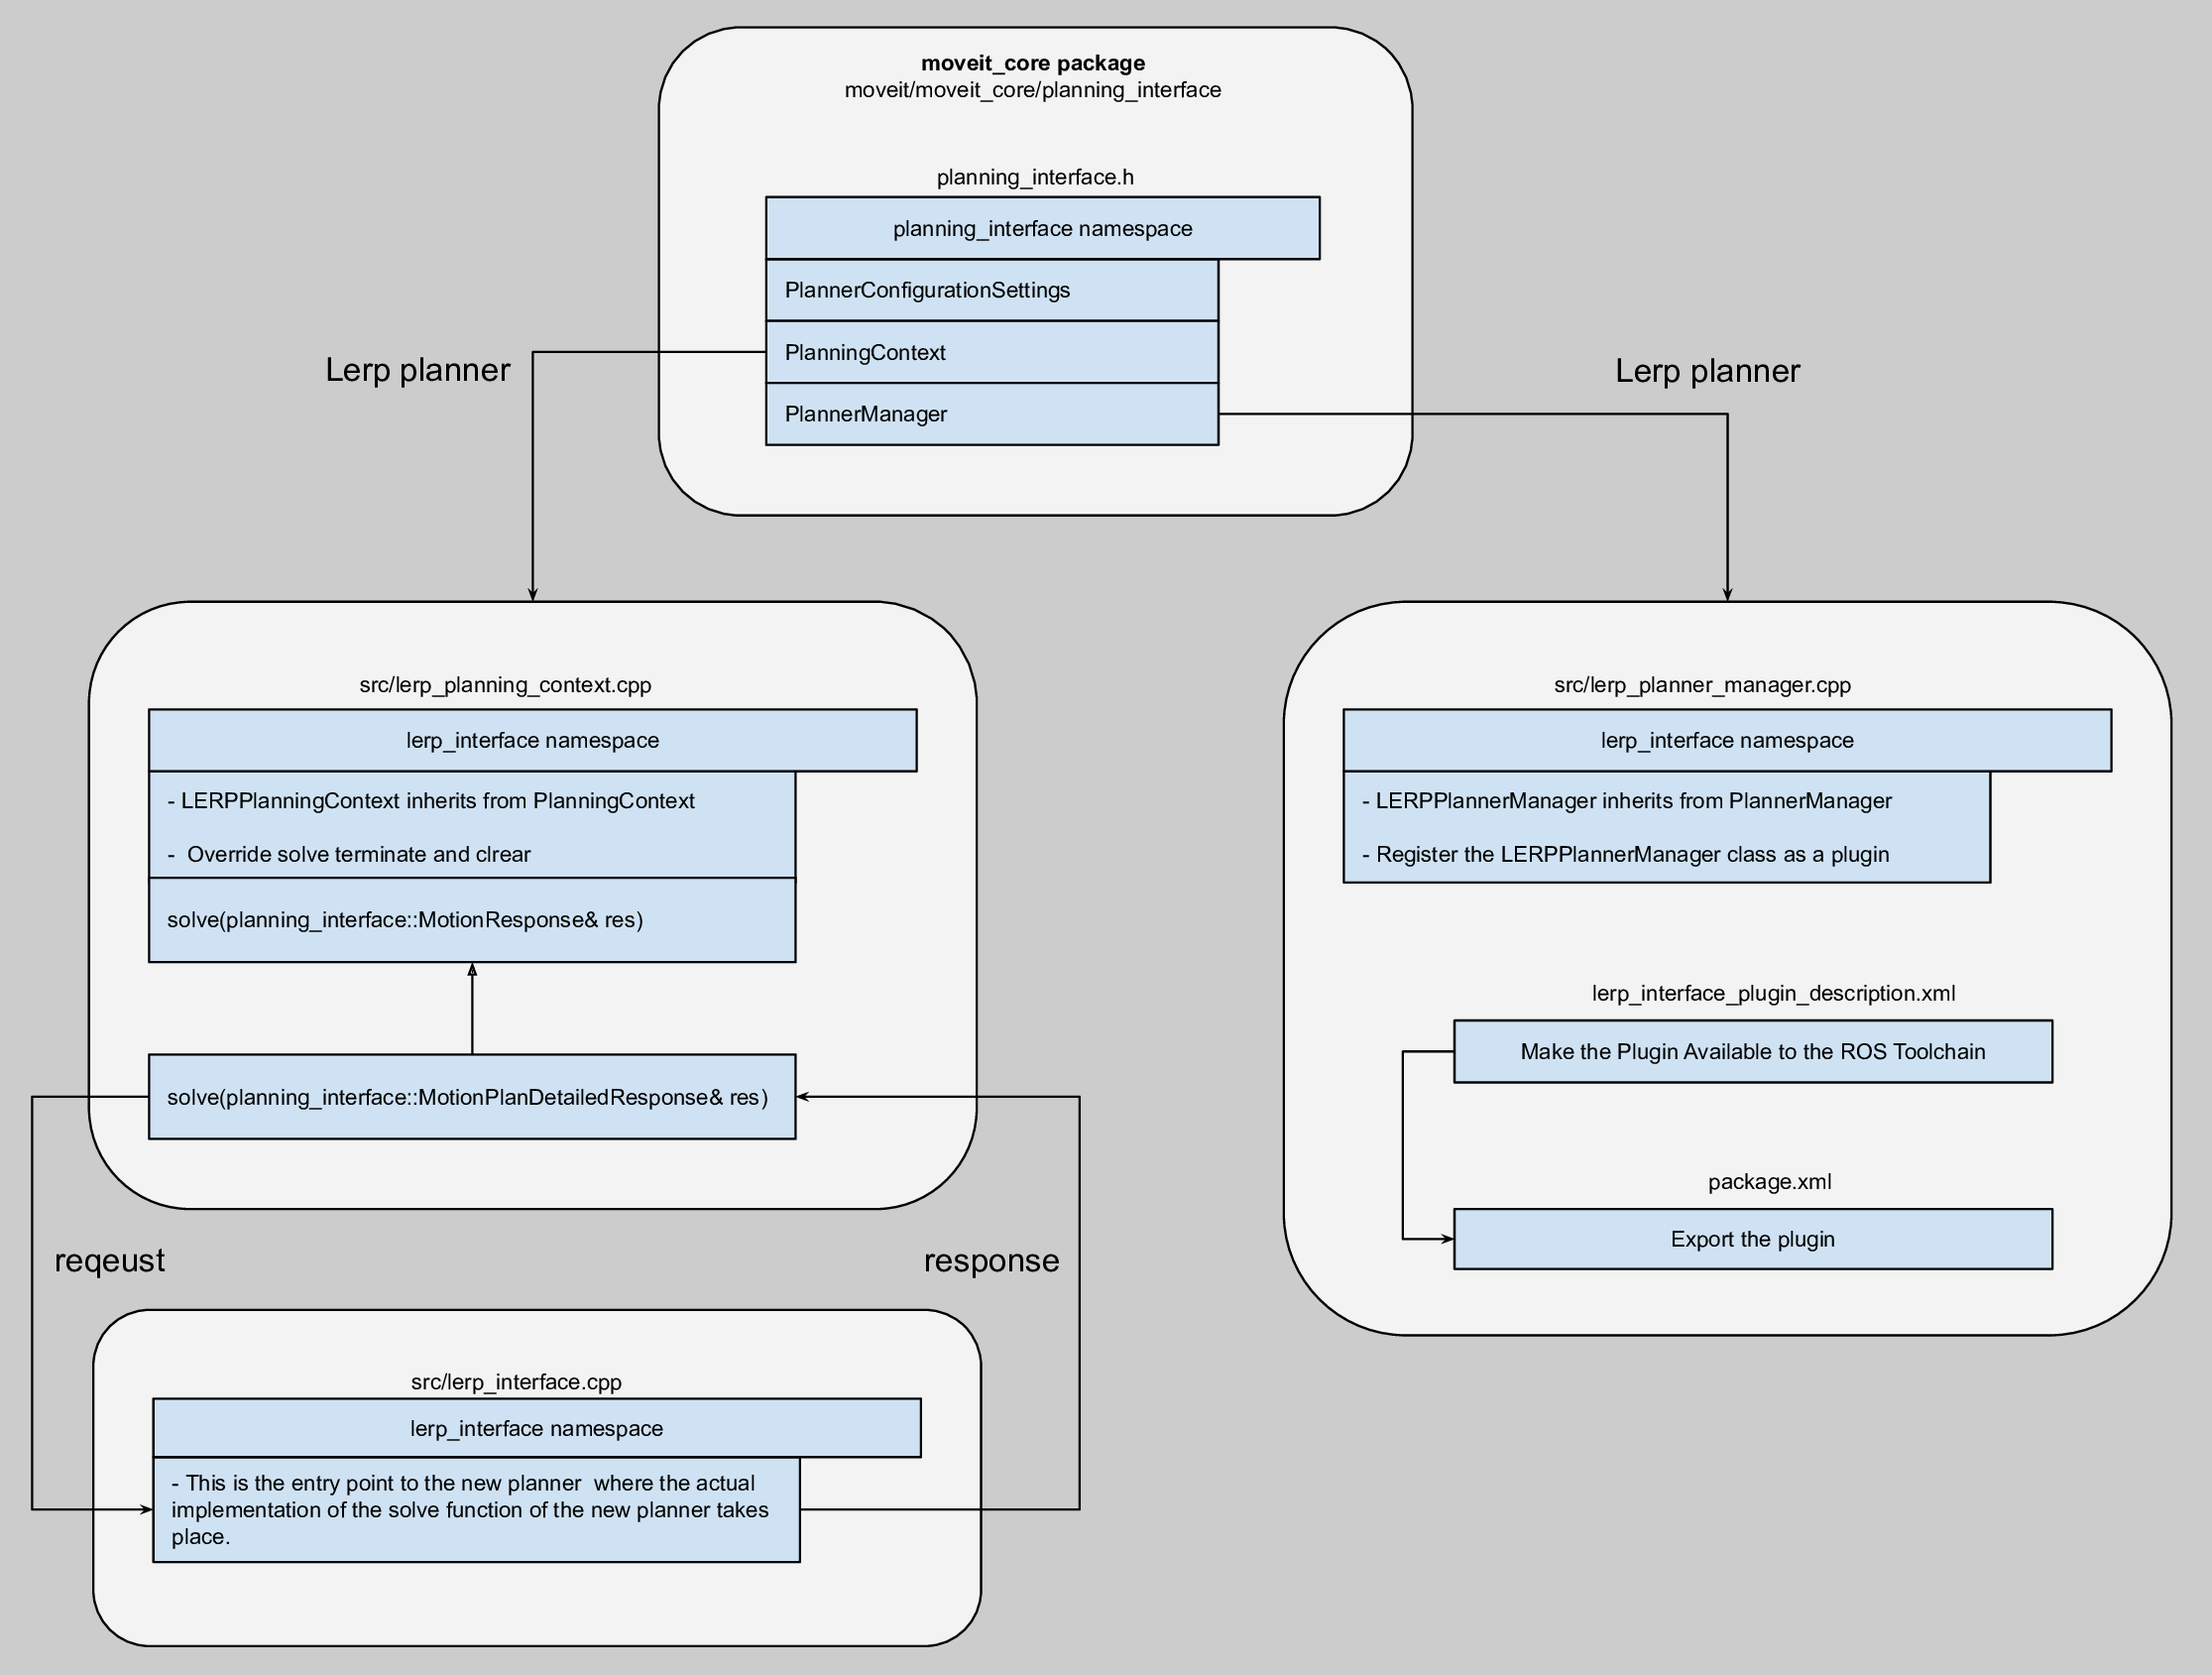
在本节中,我们将展示如何将新的运动规划器作为插件添加到 MoveIt。MoveIt 中的基类是 planning_interface 任何新的规划器插件都应该继承自该规划器。为了演示目的,创建了一个线性插值规划器 (lerp),用于规划关节空间中两个状态之间的运动。此规划器可以用作添加任何新规划器的起点,因为它包含必要的基础知识。本教程中设计的最终源文件可用 here. 下图简要展示了 MoveIt 中添加新规划器的各个类之间的关系.

首先我们在 moveit_tutorials package. 制作插件类 lerp, 创建名为 lerp_planner_manager.cpp 在 src 文件夹中。在此文件中, LERPPlanPlannerManager 覆盖了 PlannerManager 来自的类 planning_interface. 在这个文件的最后,我们需要注册 LERPPlanPlannerManager 类作为插件,这是通过 CLASS_LOADER_REGISTER_CLASS macro from class_loader:
CLASS_LOADER_REGISTER_CLASS(emptyplan_interface::EmptyPlanPlannerManager, planning_interface::PlannerManager);
接下来我们创建 LERPPlanningContext 重写以下函数的类 PlanningContext. 此类将覆盖规划器解决问题并返回解决方案的求解函数。由于求解函数实现可能需要规划器代码库中的许多类,因此创建另一个名为 LERPInterface 规划器求解方法的实际实现将在此进行。基本上,此类是新运动规划器算法的入口点。此求解函数中的响应以以下类型准备 moveit_msgs::MotionPlanDetailedResponse 转换为 planning_interface::MotionPlanDetailedResponse in LERPPlanningContext class.
而且, PlannerConfigurationSettings 可用于传递规划器特定的参数。传递这些参数的另一种方法是使用从 yaml 文件中读取的 ROS param 服务器。在本教程中,对于我们的 lerp 规划器,我们使用 lerp_planning.yaml in panda_moveit_config 仅包含一个参数的包, num_steps 加载 lerp_interface 每当其求解函数被调用时.
导出插件
首先,我们需要让插件可用于 ROS 工具链。为此,插件描述 xml 文件 (emptyplan_interface_plugin_description.xml) containing the library tag with the following options should be created:
<library  path="libmoveit_emptyplan_planner_plugin">
  <class name="emptyplan_interface/EmptyPlanPlanner" type="emptyplan_interface::EmptyPlanPlannerManager" base_class_type="planning_interface::PlannerManager">
   <description>
   </description>
  </class>
</library>
然后,为了导出插件,我们使用上述 xml 文件的地址和 package.xml 文件中的 export 标签::
<export>
   <moveit_core plugin="${prefix}/emptyplan_interface_plugin_description.xml"/>
</export>
请注意标签的名称, moveit_core, 与基类所在的包相同, planning_interface, 住在。
检查插件
使用以下命令,可以验证新插件是否已正确创建和导出::
rospack plugins --attrib=plugin moveit_core
结果应该包含“moveit_planners_lerp”和插件描述 xml 文件的地址::
moveit_tutorials <ros_workspace>/src/moveit_tutorials/creating_moveit_plugins/lerp_motion_planner/lerp_interface_plugin_description.xml
插件使用
在本小节中,我们将解释如何加载和使用我们之前创建的 lerp 规划器。为此,创建了一个名为“lerp_example.cpp”的 ros 节点。第一步是通过以下代码行获取与请求的规划组以及规划场景相关的机器人的状态和关节组::
moveit::core::RobotStatePtr robot_state(new moveit::core::RobotState(robot_model));
const moveit::core::JointModelGroup* joint_model_group = robot_state->getJointModelGroup(PLANNING_GROUP);
const std::vector<std::string>& joint_names = joint_model_group->getVariableNames();
planning_scene::PlanningScenePtr planning_scene(new planning_scene::PlanningScene(robot_model));
下一步是使用 pluginlib 加载规划器并将参数“planner_plugin_name”设置为我们创建的参数::
boost::scoped_ptr<pluginlib::ClassLoader<planning_interface::PlannerManager>> planner_plugin_loader;
planning_interface::PlannerManagerPtr planner_instance;
std::string planner_plugin_name =  "lerp_interface/LERPPlanner";
node_handle.setParam("planning_plugin", planner_plugin_name);
加载规划器后,就该设置运动规划问题的起始和目标状态了。起始状态是机器人的当前状态,设置为“req.start_state”。另一方面,通过使用目标状态和联合模型组创建“moveit_msgs::Constraints”来设置目标约束。此约束被提供给“req.goal_constraint”。以下代码显示了如何执行这些步骤::
// Get the joint values of the start state and set them in request.start_state
std::vector<double> start_joint_values;
robot_state->copyJointGroupPositions(joint_model_group, start_joint_values);
req.start_state.joint_state.position = start_joint_values;

// Goal constraint
moveit::core::RobotState goal_state(robot_model);
std::vector<double> joint_values = { 0.8, 0.7, 1, 1.3, 1.9, 2.2, 3 };
goal_state.setJointGroupPositions(joint_model_group, joint_values);
moveit_msgs::Constraints joint_goal = kinematic_constraints::constructGoalConstraints(goal_state, joint_model_group);
req.goal_constraints.clear();
req.goal_constraints.push_back(joint_goal);
到目前为止,我们已经加载了规划器并为运动规划问题创建了起始和目标状态,但我们尚未解决问题。通过创建“PlanningContext”实例并调用其求解函数,可以通过给定的起始和目标状态信息来解决关节状态下的运动规划问题。请记住,传递给此求解函数的响应应为“planning_interface::MotionPlanResponse”类型::
planning_interface::PlanningContextPtr context = planner_instance->getPlanningContext(planning_scene, req, res.error_code_);
最后,要运行此节点,我们需要在 launch 文件夹中 roslaunch lerp_example.launch。此启动文件启动 demo.launch of package panda_moveit_config by passing lerp as the name of the planner. Then, lerp_example gets launched and lerp_planning.yaml is loaded to set the lerp-specific parameters to ROS Parameter Server.
控制器管理器插件示例
MoveIt 控制器管理器,有点用词不当,是自定义低级控制器的接口。更好的理解方式是*控制器接口*。对于大多数用例,包含的 MoveItSimpleControllerManager 如果您的机器人控制器已经为 FollowJointTrajectory 提供了 ROS 操作,则足够了。如果您使用 ros_control,则随附的 MoveItRosControlInterface 也是理想的.
但是,对于某些应用程序,您可能需要更自定义的控制器管理器。提供了用于启动自定义控制器管理器的示例模板 here.
约束采样器插件示例
Create a
ROBOT_moveit_pluginspackage and within that a sub-folder for yourROBOT_constraint_samplerplugin. Modify the template provided byROBOT_moveit_plugins/ROBOT_moveit_constraint_sampler_pluginIn your
ROBOT_moveit_config/launch/move_group.launchfile, within the<node name="move_group">, add the parameter:<param name="constraint_samplers" value="ROBOT_moveit_constraint_sampler/ROBOTConstraintSamplerAllocator"/>
现在,当您启动 move_group 时,它应该默认为您的新约束采样器。