MoveItCpp 教程
简介
MoveItCpp 是一个新的高级接口,一个统一的 C++ API,不需要使用 ROS 操作、服务和消息来访问核心 MoveIt 功能,并且是现有 MoveGroup API 的替代方案(不是完全替代),我们建议需要更多实时控制或行业应用的高级用户使用此接口。此接口是 PickNik Robotics 为我们的许多商业应用开发的。
入门
如果您尚未完成,请确保您已完成 Getting Started.
运行代码
打开 shell,运行启动文件::
ros2 launch moveit2_tutorials moveit_cpp_tutorial.launch.py
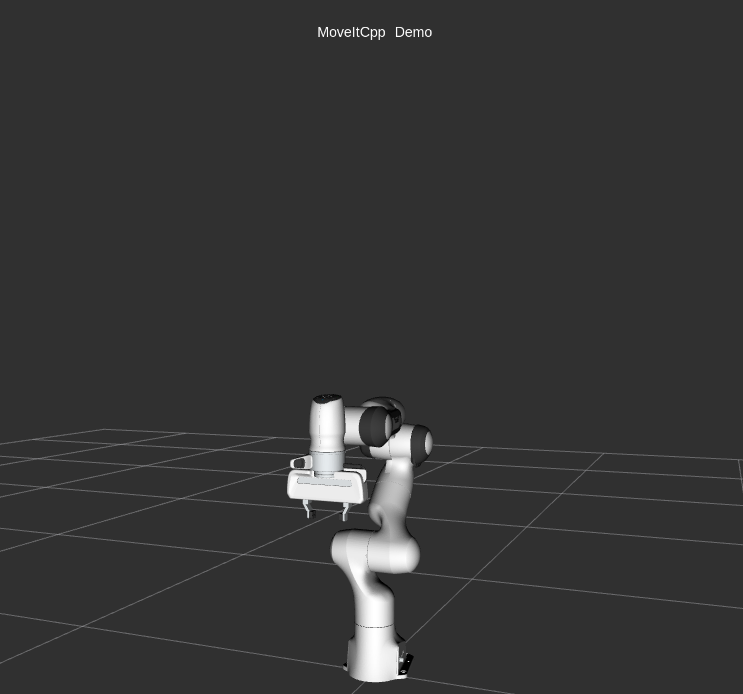
片刻之后,RViz 窗口应会出现,看起来与本页顶部的窗口类似。要完成每个演示步骤,请按屏幕底部的 RvizVisualToolsGui 面板中的 Next 按钮,或选择屏幕顶部的 Tools 面板中的 Key Tool,然后在 RViz 处于焦点时按键盘上的 0。
完整代码
可以看到完整代码 here in the MoveIt GitHub project. 接下来我们逐步分析代码来解释其功能。
Setup
static const std::string PLANNING_GROUP = "panda_arm";
static const std::string LOGNAME = "moveit_cpp_tutorial";
ros2_controllers
static const std::vector<std::string> CONTROLLERS(1, "panda_arm_controller");

/* Otherwise robot with zeros joint_states */
rclcpp::sleep_for(std::chrono::seconds(1));

RCLCPP_INFO(LOGGER, "Starting MoveIt Tutorials...");

auto moveit_cpp_ptr = std::make_shared<moveit_cpp::MoveItCpp>(node);
moveit_cpp_ptr->getPlanningSceneMonitorNonConst()->providePlanningSceneService();

auto planning_components = std::make_shared<moveit_cpp::PlanningComponent>(PLANNING_GROUP, moveit_cpp_ptr);
auto robot_model_ptr = moveit_cpp_ptr->getRobotModel();
auto robot_start_state = planning_components->getStartState();
auto joint_model_group_ptr = robot_model_ptr->getJointModelGroup(PLANNING_GROUP);
Visualization
The package MoveItVisualTools provides many capabilities for visualizing objects, robots, and trajectories in RViz as well as debugging tools such as step-by-step introspection of a script
moveit_visual_tools::MoveItVisualTools visual_tools(node, "panda_link0", "moveit_cpp_tutorial",
                                                    moveit_cpp_ptr->getPlanningSceneMonitorNonConst());
visual_tools.deleteAllMarkers();
visual_tools.loadRemoteControl();

Eigen::Isometry3d text_pose = Eigen::Isometry3d::Identity();
text_pose.translation().z() = 1.75;
visual_tools.publishText(text_pose, "MoveItCpp_Demo", rvt::WHITE, rvt::XLARGE);
visual_tools.trigger();
Start the demo
visual_tools.prompt("Press 'next' in the RvizVisualToolsGui window to start the demo");
Planning with MoveItCpp
There are multiple ways to set the start and the goal states of the plan they are illustrated in the following plan examples
Plan #1
We can set the start state of the plan to the current state of the robot
planning_components->setStartStateToCurrentState();
The first way to set the goal of the plan is by using geometry_msgs::PoseStamped ROS message type as follow
geometry_msgs::msg::PoseStamped target_pose1;
target_pose1.header.frame_id = "panda_link0";
target_pose1.pose.orientation.w = 1.0;
target_pose1.pose.position.x = 0.28;
target_pose1.pose.position.y = -0.2;
target_pose1.pose.position.z = 0.5;
planning_components->setGoal(target_pose1, "panda_link8");
Now, we call the PlanningComponents to compute the plan and visualize it. Note that we are just planning
const planning_interface::MotionPlanResponse plan_solution1 = planning_components->plan();
Check if PlanningComponents succeeded in finding the plan
if (plan_solution1)
{
Visualize the start pose in Rviz
visual_tools.publishAxisLabeled(robot_start_state->getGlobalLinkTransform("panda_link8"), "start_pose");
Visualize the goal pose in Rviz
visual_tools.publishAxisLabeled(target_pose1.pose, "target_pose");
visual_tools.publishText(text_pose, "setStartStateToCurrentState", rvt::WHITE, rvt::XLARGE);
Visualize the trajectory in Rviz
  visual_tools.publishTrajectoryLine(plan_solution1.trajectory, joint_model_group_ptr);
  visual_tools.trigger();

  /* Uncomment if you want to execute the plan */
  /* bool blocking = true; */
  /* moveit_controller_manager::ExecutionStatus result = moveit_cpp_ptr->execute(plan_solution1.trajectory, blocking, CONTROLLERS); */
}
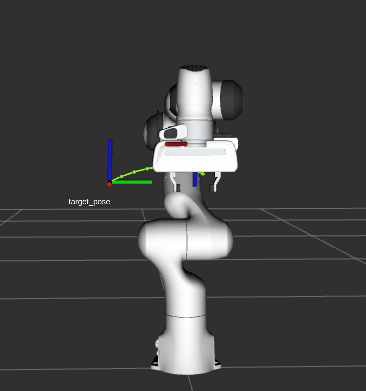
Plan #1 visualization:
Start the next plan
visual_tools.prompt("Press 'next' in the RvizVisualToolsGui window to continue the demo");
visual_tools.deleteAllMarkers();
visual_tools.trigger();
Plan #2
Here we will set the current state of the plan using moveit::core::RobotState
auto start_state = *(moveit_cpp_ptr->getCurrentState());
geometry_msgs::msg::Pose start_pose;
start_pose.orientation.w = 1.0;
start_pose.position.x = 0.55;
start_pose.position.y = 0.0;
start_pose.position.z = 0.6;

start_state.setFromIK(joint_model_group_ptr, start_pose);

planning_components->setStartState(start_state);
We will reuse the old goal that we had and plan to it.
auto plan_solution2 = planning_components->plan();
if (plan_solution2)
{
  moveit::core::RobotState robot_state(robot_model_ptr);
  moveit::core::robotStateMsgToRobotState(plan_solution2.start_state, robot_state);

  visual_tools.publishAxisLabeled(robot_state.getGlobalLinkTransform("panda_link8"), "start_pose");
  visual_tools.publishAxisLabeled(target_pose1.pose, "target_pose");
  visual_tools.publishText(text_pose, "moveit::core::RobotState_Start_State", rvt::WHITE, rvt::XLARGE);
  visual_tools.publishTrajectoryLine(plan_solution2.trajectory, joint_model_group_ptr);
  visual_tools.trigger();

  /* Uncomment if you want to execute the plan */
  /* bool blocking = true; */
  /* moveit_cpp_ptr->execute(plan_solution2.trajectory, blocking, CONTROLLERS); */
}
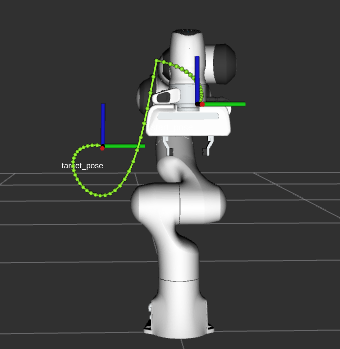
Plan #2 visualization:
Start the next plan
visual_tools.prompt("Press 'next' in the RvizVisualToolsGui window to continue the demo");
visual_tools.deleteAllMarkers();
visual_tools.trigger();
Plan #3
We can also set the goal of the plan using moveit::core::RobotState
auto target_state = *robot_start_state;
geometry_msgs::msg::Pose target_pose2;
target_pose2.orientation.w = 1.0;
target_pose2.position.x = 0.55;
target_pose2.position.y = -0.05;
target_pose2.position.z = 0.8;

target_state.setFromIK(joint_model_group_ptr, target_pose2);

planning_components->setGoal(target_state);
We will reuse the old start that we had and plan from it.
auto plan_solution3 = planning_components->plan();
if (plan_solution3)
{
  moveit::core::RobotState robot_state(robot_model_ptr);
  moveit::core::robotStateMsgToRobotState(plan_solution3.start_state, robot_state);

  visual_tools.publishAxisLabeled(robot_state.getGlobalLinkTransform("panda_link8"), "start_pose");
  visual_tools.publishAxisLabeled(target_pose2, "target_pose");
  visual_tools.publishText(text_pose, "moveit::core::RobotState_Goal_Pose", rvt::WHITE, rvt::XLARGE);
  visual_tools.publishTrajectoryLine(plan_solution3.trajectory, joint_model_group_ptr);
  visual_tools.trigger();

  /* Uncomment if you want to execute the plan */
  /* bool blocking = true; */
  /* moveit_cpp_ptr->execute(plan_solution3.trajectory, blocking, CONTROLLERS); */
}
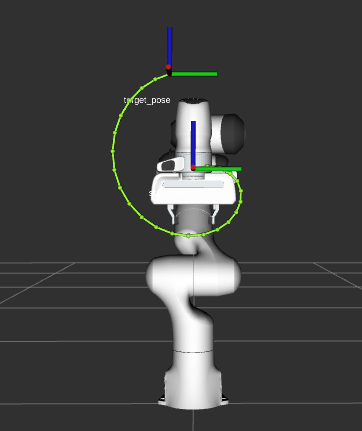
Plan #3 visualization:
Start the next plan
visual_tools.prompt("Press 'next' in the RvizVisualToolsGui window to continue the demo");
visual_tools.deleteAllMarkers();
visual_tools.trigger();
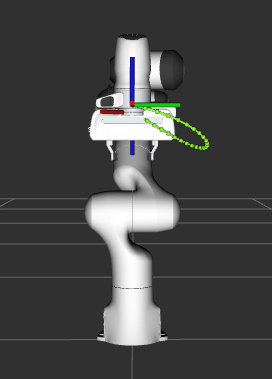
Plan #4
We can set the start state of the plan to the current state of the robot We can set the goal of the plan using the name of a group states for panda robot we have one named robot state for “panda_arm” planning group called “ready” see panda_arm.xacro
/* // Set the start state of the plan from a named robot state */
/* planning_components->setStartState("ready"); // Not implemented yet */
Set the goal state of the plan from a named robot state
planning_components->setGoal("ready");
Again we will reuse the old start that we had and plan from it.
auto plan_solution4 = planning_components->plan();
if (plan_solution4)
{
  moveit::core::RobotState robot_state(robot_model_ptr);
  moveit::core::robotStateMsgToRobotState(plan_solution4.start_state, robot_state);

  visual_tools.publishAxisLabeled(robot_state.getGlobalLinkTransform("panda_link8"), "start_pose");
  visual_tools.publishAxisLabeled(robot_start_state->getGlobalLinkTransform("panda_link8"), "target_pose");
  visual_tools.publishText(text_pose, "Goal_Pose_From_Named_State", rvt::WHITE, rvt::XLARGE);
  visual_tools.publishTrajectoryLine(plan_solution4.trajectory, joint_model_group_ptr);
  visual_tools.trigger();

  /* Uncomment if you want to execute the plan */
  /* bool blocking = true; */
  /* moveit_cpp_ptr->execute(plan_solution4.trajectory, blocking, CONTROLLERS); */
}
Plan #4 visualization:
Start the next plan
visual_tools.prompt("Press 'next' in the RvizVisualToolsGui window to continue the demo");
visual_tools.deleteAllMarkers();
visual_tools.trigger();
Plan #5
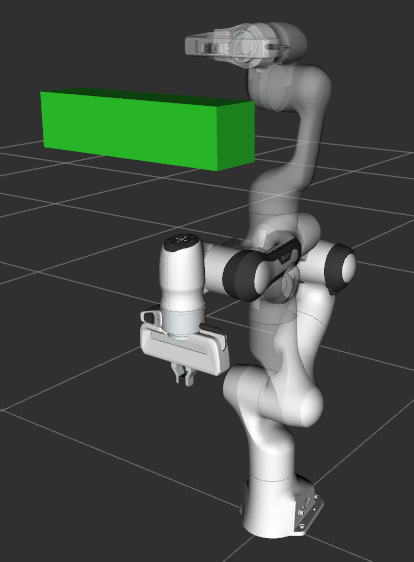
We can also generate motion plans around objects in the collision scene.
First we create the collision object
moveit_msgs::msg::CollisionObject collision_object;
collision_object.header.frame_id = "panda_link0";
collision_object.id = "box";

shape_msgs::msg::SolidPrimitive box;
box.type = box.BOX;
box.dimensions = { 0.1, 0.4, 0.1 };

geometry_msgs::msg::Pose box_pose;
box_pose.position.x = 0.4;
box_pose.position.y = 0.0;
box_pose.position.z = 1.0;

collision_object.primitives.push_back(box);
collision_object.primitive_poses.push_back(box_pose);
collision_object.operation = collision_object.ADD;
Add object to planning scene
{  // Lock PlanningScene
  planning_scene_monitor::LockedPlanningSceneRW scene(moveit_cpp_ptr->getPlanningSceneMonitorNonConst());
  scene->processCollisionObjectMsg(collision_object);
}  // Unlock PlanningScene
planning_components->setStartStateToCurrentState();
planning_components->setGoal("extended");

auto plan_solution5 = planning_components->plan();
if (plan_solution5)
{
  visual_tools.publishText(text_pose, "Planning_Around_Collision_Object", rvt::WHITE, rvt::XLARGE);
  visual_tools.publishTrajectoryLine(plan_solution5.trajectory, joint_model_group_ptr);
  visual_tools.trigger();

  /* Uncomment if you want to execute the plan */
  /* bool blocking = true; */
  /* moveit_cpp_ptr->execute(plan_solution5.trajectory, blocking, CONTROLLERS); */
}
Plan #5 visualization:
启动文件
整个启动文件是 here 在 GitHub 上。本教程中的所有代码都可以从 moveit2_tutorials 作为 MoveIt 设置的一部分的包。